Although my mining PC, The Beast, is capable of mining cryptocurrency profitably I was concerned about the amount of heat it produced, and consequently how noisy it was (because of the graphics card fans running hard). My conclusion was that it was not set up well for running the graphics cards continuously because most of the cooling airflow bypassed the cards.
That can be seen in this photo where I have tried to illustrate the airflow route – it comes in the front of the case via the fan in the middle, then gets pulled through the CPU heatsink via the CPU fan then exits out the far corner through the outlet fan. This makes sense for a PC where the CPU is running hard. It’s pretty useless for crypto mining where the graphics cards – whose positions are ringed in red – are doing all the work and generating all the heat.
The current airflow largely bypasses the hot graphics cards (Image: BIUK)
The main change I have implemented therefore is to install a second inlet fan, nearly opposite the graphics cards, powered from the same connector as the current fan (so they match speeds). I have also removed two expansion card blanking plates between the graphics cards so there is more space for the hot air to exit after it has passed the graphics cards.
This is the ‘after’ picture:
After the addition of a second front fan (Image: BIUK)
The result is that the graphics cards are running cooler most of the time, and significantly cooler if I manually increase the speed of the inlet fans. The main issue now is that they are set to automatically react to the CPU temperature, which of course stays relatively low, rather than directly to the GPU temperature. My next step in cooling will therefore be to look into slaving the fan speed to the GPU temp.
That is not a standard feature on almost any motherboard or fan utility, but is apparently something that can be done by a third party utility called SpeedFan. But that’s for another day – for now I’m happy to keep mining with the system as it is with the extra fan.
Following my initial attempts at mining I had decided to stick with NiceHash on my old PC as a good compromise between mining performance and convenience. Therefore it was natural to move straight to mining with NiceHash on The Beast.
Earnings
Initial results have been largely encouraging – as might be expected given its impressive performance. Certainly it can mine profitably: as I write this it has Daily Estimated Earnings of about 0.0004 BTC, currently worth about £2 per day.
Nicehash Mining with The Beast April 2018 (Image: BIUK)
I have a screenshot from back in February showing a slightly greater Bitcoin earning rate of 0.00048 BTC:
Nicehash Mining with The Beast February 2018 (Image: BIUK)
But because of the volatile nature of Bitcoin value we can see that only two months ago that was worth nearly £3.50 per day. Because of this volatility I try not to focus too much on the fiat earnings but instead on the Bitcoin earnings, since I think long term that’s what matters.
I use a Kill-a-watt style meter to see how much electricity the PC is using – and currently it’s 400W. Though that’s not all spent on mining, since the PC gets used for other things (like this blog) it’s a good enough approximation. So in the worst case, over 24 hours this PC will use 24 x 0.4 = 9.6 kWh. At about 15p per kWh that would cost £1.44 – so definitely I’m into profit.
In fact it’s much better than that:
During the daylight hours our roof generates a lot of solar, so in that period the electricity is effectively free.
For seven hours during the night we run on Economy 7 electricity at approximately half price.
I recently had a home battery installed to power the house from our solar once the sun has gone down (one of these: PowerBanx).
So in practice I’m definitely paying less than half the maximum, and probably less than 50p per day.
Downsides
That’s the good news. The bad news is that there are downsides beyond just the cost of electricity. Specifically The Beast runs hot – I’m monitoring it with MSI Afterburner and in less than an hour after starting mining the graphics cards hit their default maximum temperature of 83° C.
MSI Afterburner showing high graphics card temperatures during mining (Image: BIUK)
The results of this are:
The PC generates a lot of heat, much like having a fan heater running in the room.
The graphics cards are temperature limited and could probably generate more money if they weren’t so hot.
The PC gets noisy as all its fans are running flat out.
The upshot of this is that I’ve bought an extra fan to go into the PC case low down where the graphics cards are. Currently the case has most of its air flow going along the top where the CPU is, but that’s hardly used during mining. I think this is a case where Scan made a mistake in the system design, despite me making it clear the PC was intended for cryptocurrency mining.
I’ll install the new fan as soon as I can and then report back on the results.
Once my mining PC (‘The Beast’) had arrived it unfortunately sat around for a while as I was busy on other things (particularly getting my tax return done). Once more time became available the first thing I did was to check out The Beast’s performance.
Having paid out for a high end system I was hoping for great things. I ran two particular suites of tests: 3D Mark and PassMark.
3D Mark
The 3D Mark software is used for evaluating specific 3D graphics card performance – the most crucial element in cryptocurrency mining.
3DMark Home Page (Image: BIUK)
3D Mark works primarily by running the latest version of the Time Spy benchmark at high resolution and with a range of graphical features enabled to determine how well the graphic card(s) can keep up. The benchmark is impressive to watch run with highly complex and challenging scenes running through at an impressive speed.
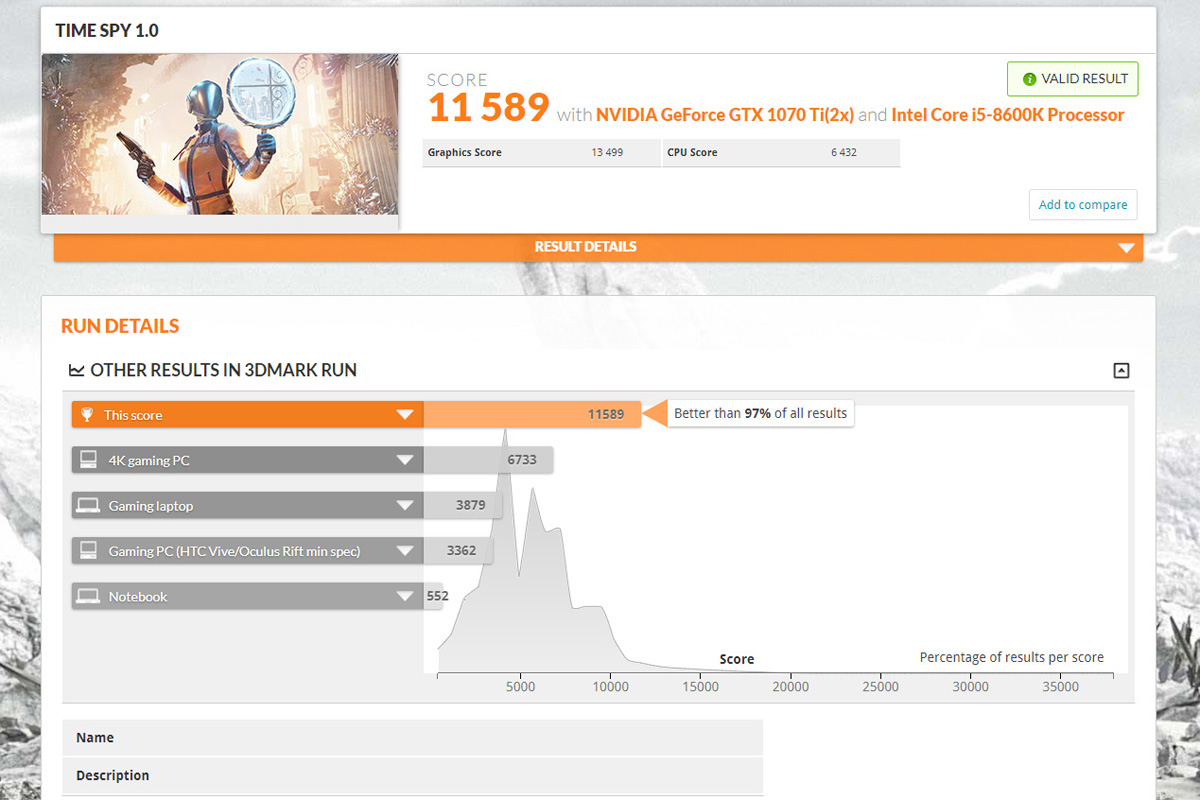
I’m pleased to say the Beast showed itself off well, with an overall 3D Mark score of 11,589.
3DMark Results (Image: BIUK)
Comparing this to all the PCs logged against 3D Mark shows The Beast’s score to be better than 97% of all results.
3DMark Comparison (Image: BIUK)
PassMark PerformanceTest9
The PerformanceTest9 benchmark by PassMark, in contrast, is for bench-marking general PC performance, including CPU, disk and memory speed – although it does also include some graphical tests.
PassMark PerformanceTest Screen (Image: BIUK)
Again The Beast acquitted itself well with 5/5 scores for CPU, 3D Graphics, Memory and Disk (though only 4.5/5 for 2D Graphics).
PerformanceTest Scores (Image: BIUK)
It achieved an overall score of 6736:
PerformanceTest Score (Image: BIUK)
And individual results putting it in the 99th Percentile, against other PCs testing with the same benchmark, for CPU, 3D Graphics, Memory and Disk (though only 90th Percentile for 2D Graphics):
PerformanceTest Comparison (Image: BIUK)
Summary
Overall I was very pleased with the core performance of The Beast, particularly its raw 3D performance which is the key to cryptocurrency mining.
After my initial experiments into mining for cryptocurrency with my own PC’s GPU and CPU, and even before acquiring my improved GPU, it was clear that good mining results were only possible with specialised and up-to-date hardware. Therefore about Christmas I ordered a new PC with a view to designing it for use in cryptocurrency mining.
We needed a new family PC for occasional use anyway (for children’s homework, etc.) as our previous one was old and had slowed down to the point it was almost useless. At the same time I knew it would be idle most of the time, when it could be used as a dedicated mining machine.
The Beast – High End Mining PC (Image: BIUK)
I took some time investigating the options before deciding on the specification I wanted. Although all our previous PCs had come from Dell, this time I ordered through Scan PC to get exactly what I wanted at an acceptable price:
A gaming motherboard with twin high speed GPU slots
A large, clear-airflow case with sound insulation
Two top-end GPUs – the NVidia GTX 1070 Ti
A high power (850W) power supply
High performance disks (an SSD for fast access, and a RAID array for backup)
The Beast – High End Mining PC (Image: BIUK)
In discussions with Scan I changed the spec a couple of times after ordering (e.g. increasing the memory) and was pretty happy with their service. It arrived in January and so far has shown itself to be a very powerful machine. It cost an eye-watering £2500, but then the two graphics cards alone were about £650 each.
I’ll blog about how I got on with it, including its mining capability, in the next few posts.
My recent attempts to mine cryptocurrency using CCMiner and MinerGate were disappointing dead-ends – I had really been sidetracked by accounts I’d read of people making these approaches profitable, even though they were not mainstream.
This time I’ve decided to cut to the chase and just use NiceHash, probably the most popular mining pool and supposedly the world’s ‘largest crypto-mining markeplace’. If I can’t make a profit there then I should probably just give up.
NiceHash Mining Marketplace Home Page (Image: BIUK)
Go to NiceHash.com and click on For sellers (with NiceHash you’re not directly mining, rather selling your mining power to other users to mine with). For a PC click on ‘I want to earn with my CPU or GPU‘. Download and install the NiceHash Miner software, choosing the version that’s appropriate for your graphics card.
When the software runs, accept the License Agreement and Risk Acknowledgement. It will then start setting itself up – note your virus scanner may give a warning (and even quarantine some files) so be ready for that; you may need to restart the installation if it appears to hang.
NiceHash Miner setting up (Image: BIUK)
The miner launches a command window when it’s ready to run. It should show that it has found the graphics card and ‘initialized’.
NiceHash Miner command window (Image: BIUK)
Once it is happy it will show its main screen ready to start:
NiceHash Miner ready screen (Image: BIUK)
Click on the link at the bottom to ‘Set your wallet‘. If you don’t already have an account at NiceHash you will need to create one. Registering for a new account is straightforward, you just click on the Create New Account to go to NiceHash, there you enter your email address and a password. Then you will need to setup the account (language, currency, create wallet, etc.).
Once done, enter the email address for the account into the NiceHash miner and click Save. The previous link will have changed to ‘Benchmark your devices‘; click on it, then the Benchmark All button and the Standard button.
The miner will benchmark and optimise for your system; this took just over 10 minutes on my PC. When it’s done click back to the main screen and click on the Start button. The status will change to Active – Running and mining is underway. The amount earned so far will show as Balance and the amount you are predicted to earn per day is shown as Daily Estimated Earnings (about £1 for this system).
Clicking on View Stats Online will take you to your account on NiceHash.com to show you more details, including your total earnings so far (the current Balance on the app is reset each time you start it). The overview there is particularly useful if you have more than one PC mining at the same time.
I’ve just set the system running and will check in an hour to see the result. What’s impressive is how quiet it is running – there must be scope to overclock it significantly. To get a better idea of what’s going on I’ve run up MSI Afterburner as recommended before.
Here I can see that the GPU is running at a temperature of just 65 degrees C – hardly working at all though it’s at 100% usage – and the CPU is likewise at about 60 degrees. Again this implies lots of opportunities for overclocking.
It’s now been running for an hour and it has earned 0.000004 BTC, worth about 3.2p. Energy usage by the PC has been 0.2 kWh, costing about 2.8p so it’s made a profit of 0.4p in an hour. That’s equivalent to about 10p per day.
It’s not a great deal of money – but at least it’s a profit!
This time the benchmark score was 1998 with a message “You can make an extra 100 USD per year with only this computer” – both values being roughly double what they had been before the upgrade.
MinerGate’s benchmark on a GTX 1050 system (Image: BIUK)
For the best outcome I set the mining to use both the CPU and the GPU (graphics card). This produced about 3 times as much hashing power as before.
Mining XMR using the MinerGate app and a GXT 1050 card (Image: BIUK)
However, given the poor results from last time (about 15p of Monero/XMR mined for 50p in costs) it’s clear that even at 3 times the mining power it would still not be very profitable. This is therefore another dead end.
The graphics card in my home PC died recently, probably related to me leaving the PC overnight which I don’t usually do (I guess it overheated). I woke to find that Windows had seen an error on it and uninstalled the driver, running it as a basic VGA card. I couldn’t fix it.
Anyway, I took the opportunity to buy a new mid-range graphics card, an Nvidia GTX 1050, to do some more experimenting with crypto mining. I didn’t want to go for a high-end (i.e. expensive) card since I have no plans to leave my PC running most of the time, or even to be mining while I was working at the PC, so a high-end card would likely never make its cost back.
A mid-range card, though, seemed like a good compromise – I needed a new card anyway, I could do some crypto experimenting, and I would get a benefit whenever I played 3D games. I settled on an EVGA card from Scan Computers as it was the cheapest version of the 1050 available – just £120 for a pretty powerful card.
Most impressive was that it didn’t need any additional power connectors to run, just making do with the power available from the motherboard slot. That implied it would use very little power – whereas the old (and relatively speaking slow) card it replaced had been using two additional power connections.
As an initial experiment I have rerun the test I did back last November using the GPU to mine for Bitcore. The procedure was much as described before (particularly following the embedded video) but with a couple of changes. Firstly, the mining app is no longer available on the Bitcore website so I downloaded it directly from the CCMiner code site. Secondly the batch file format has changed – however the download included a new Bitcore batch file so I used that, edited to include my Suprnova details as per the original post.
When CCMiner ran up the results were encouraging, showing a hash rate (mining power) of 8600 kH/s (8.6 MH/s), compared to about 1500 for the previous card.
CCMIner starting up on a GTX 1050 GPU (Image: BIUK)
Running CCMiner for two hours produced 0.0018 BTX, according to my Suprnova dashboard, worth currently about 4p (the equivalent of about 50p per day). The PC was using about 150W with the card running and 85W without, so the card was drawing 65W – or 0.13kWh for the two hours. At my evening rate of 14p/kWh that means the mining cost me about 2p.
Suprnova Dashboard while running a GTX 1050 (Image: BIUK)
So – unlike last time – mining with this card is actually profitable, though only at the rate of about 1p per hour. What was more impressive, however, was how it did it.
Firstly, the energy use by the card was much less than the old card even though it was much more powerful, and it was very quiet. Secondly, it appeared to be truly mining ‘in the background’ with no apparent slowness caused to the PC while using it for other things. So it could make a profit, with little downside to having it running in the background virtually all the time. Taken together, it would seem that there’s plenty of scope to overclock the card to improve the performance.
Nonetheless, the bottom line is that this approach is not going to make a great deal of money, so I’m moving on to try other mining methods.
After my initial rather disappointing first foray into mining cryptocurrency (specifically the Bitcore coin using my PC’s graphics card) I didn’t pursue the idea further. It hadn’t been a great surprise as my graphics card was old and looking rather underpowered compared to the latest GPUs.
However, last week I heard about someone profitably CPU mining the Aeon coin and I decided to take another look. I followed the same process, starting by downloading the Minergate software.
I installed it (despite lots of warnings, presumably false alarms, about viruses), created an account and kicked it off. You need to create an account on the MinerGate.com website, and you then link to this from the MinerGate app.
Mining XMR using the MinerGate app (Image: BIUK)
The process began with running a benchmark. The result of this was a score for my PC of 927 – four stars! That sounded encouraging. However it then said “You can make an extra 50 USD per year with only this computer” which rather brought things down to earth.
Anyway, after running it overnight the results were that I made a few tens of pence in Monero/XMR in parallel with FantomCoin/FCN (the software chooses what it believes is the most profitable coins for you) but spent about 50p in electricity. So overall it was not profitable.
My conclusion therefore is not just that my old PC isn’t any good for GPU mining of cryptocurrency, it’s no use for CPU mining either!
My cunning plan now is to use a new, powerful gaming PC for mining that I ordered recently. Watch this space to see how I get on.
Like everyone involved in cryptocurrency I know that Bitcoin and other coins are produced through mining:
Bitcoin mining is the process by which transactions are verified and added to the public ledger, known as the block chain, and also the means through which new bitcoin are released. Anyone with access to the internet and suitable hardware can participate in mining. The mining process involves compiling recent transactions into blocks and trying to solve a computationally difficult puzzle. The participant who first solves the puzzle gets to place the next block on the block chain and claim the rewards. The rewards, which incentivize mining, are both the transaction fees associated with the transactions compiled in the block as well as newly released bitcoin.
I also know that in most cases Bitcoin mining is done by big organisations, mostly in China and Eastern Europe, running large farms of mining computers. It’s tough to compete against that.
Cryptocurrency Mining Farm (Image: M. Krohn/Wikimedia)
However, in learning about my current ‘favourite’ coin, Bitcore (BTX), I found out that it can be mined on a home PC with a half-decent graphics card. I decided to give it a go.
The basic process is straightforward:
You run a dedicated mining app, typically CCMiner, which mines Bitcore by maxing out your graphics card.
You connect the app to an online mining pool server so your mining power contributes to a pool of other miners’ hardware and you share the coins created. I use Suprnova.cc.
You connect your mining pool account to your Bitcore wallet so that payouts come to you.
The details are covered well in a YouTube video by Mod Rage, ‘How to Mine Bitcore (BTX) for Beginners (From Scratch)‘, included below. There’s another one that gives some additional useful information by IMineBlocks.
My Setup
When I initially tried running CCMiner I got the error “qubit_luffa512_cpu_init” each time. I worked out this indicated my graphics card was too old to run the latest version of CCMiner – no great surprise there – so I went back through older versions to find one that worked for me. That turned out to be the x64 version of build CCMiner v2.2.
When you start up the miner, initially not a lot happens – you just get a command window with a basic startup screen:
CC Miner Screen – startup (Image: BIUK)
After a minute or two, however, you will likely become aware of a rising background noise as your graphics card starts to ‘take off’. You may also find your PC’s response becomes a bit ‘sluggish’. Here mine has started – the card temperature has increased from 68C to 88C, and the fan speed from 46% to 67%:
CC Miner Screen – startup 2 (Image: BIUK)
The key thing is the “yes!” message which tells us it has started to mine successfully (failure is indicated by “boo!”). Success seems to improve over time, so initially I only get occasional successes:
CC Miner Screen – early on (Image: BIUK)
But half an hour or so after starting up each time I see screens like this – we’re up and running (the card settles at a temperature of about 95C and a fan speed of about 85%):
CC Miner Screen – up and running (Image: BIUK)
In parallel we can monitor the status on the Suprnova website – this shows us in approximate real-time how much solving power (‘hashrate’) we are contributing to the pool, for example:
Suprnova Status screen (Image: BIUK)
To monitor the graphics card itself, which of course is now running hot, you can use various utilities. Probably the best known is MSI Afterburner – here it is (with its UI skin set to ‘Default MSI Afterburner v3 – big edition’) showing a real-time display of card temperature and Graphics Processing Unit (GPU) usage:
Afterburner Status screen (Image: BIUK)
The GPU usage varies over time, but if I stop using the PC for other things it starts to settle near 100% as you would expect.
Mining Results
So is Bitcore mining profitable with my setup? I decided to work it out over the course of an evening, specifically a 5 hour period.
First I used a watt meter to work out how much energy the PC consumed. This turned out to be about 240W when mining and about 180W when not mining, so about 25% of the electricity used in that period was used for mining.
The watt meter told me I had used 1.25kWh over the period so about 0.3kWh was used for mining. My evening electricity rate is about 14p/kWh so the mining cost me about 4p.
So how much did I earn? Suprnova tells me I mined about 0.0006 BTX, which is worth somewhere around 2p. So no, my setup isn’t profitable as I ran it.
Can Bitcore Mining Be Profitable?
The result is interesting to me because, actually, it’s not as bad as I feared. After all, I am running an old PC with a graphics card that is old enough it can’t run the latest – and presumably most efficient – mining software.
(Tip: you can look up the power, ‘Compute Capability’, of your Nvidia card here. A good value is 6+, mine – a 1Gb NVIDIA GeForce GTX 560 Ti – is 2.1).
With the current setup I could:
Run only at night, leaving the PC mining on Economy 7 electricity and unattended (which should get the efficiency up by 10%-15%). My overnight rate is about half the daytime rate so immediately I would be close to breaking even, and maybe even making a profit.
Run only during the middle part of the day, with the PC mining just on electricity from my solar panels. It would immediately become profitable, even if only at the rate of a few pence per day. And that’s without even trying overclocking on the card.
Of course, if I really want to mine seriously I would be looking at buying new hardware – specifically a powerful graphics card, as it’s not necessarily an issue if the PC isn’t particularly fast.
Initial research implies that a current top-end graphics card may have enough power (hashrate) to mine at perhaps 30 times the rate of my current card. Suddenly Bitcore mining starts to become a realistic proposition – a profit of £1-2 per day seems achievable – so I’m going to investigate further.